As a 3D professional and tech savvy person, I, of course, want to plan the interior design of our new apartment with the help of modern computer based tools.
But which tool would be the most suitable?
As this is for private use, this would be my requirements:
- 3-dimensional
- low-cost
- possibility to combine it with 3D laser scan data (I am already looking forward to set up my scanner the first time on the construction site…)
- available on my Mac
- reasonable learning effort
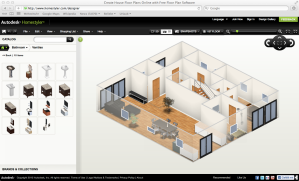
The first step in Autodesk´s Homestyler.com
In case you are reading this blog frequently, you may know that I made my frist trials with Homestyler by Autodesk. Apparently this system fulfilled all the requirements above. But mainly the limited viewing possibilities and difficulties when trying to accurately place furniture let me stop moving along this path.
My next trials were made with SketchUp. This software in the meantime belongs to Trimble (was owned by Google before). There is a free-of-cost version available for iOS as well.
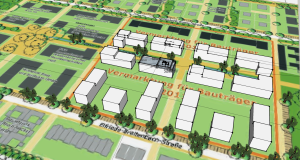
Next experiment using SketchUp
In general SketchUp is a very interesting 3D modelling software which allows to start creating in 3D in a very intuitive way. Sketching the whole neighbourhood based on an image of the city map was quickly done. But after working with it for a while I also realized the disadvantages of the concept. While you can start very quickly, once you want to go into more detail design work it starts to become a bit tricky. Creating a building drawing according to accurate dimensions is possible, but due to the user interface concept of SketchUp drawing becomes slow and a bit cumbersome.
Modifying objects in a controlled way proved to be tricky in SketchUp
Another difficulty occurs once you try to modify objects. An apparently simple task like moving a wall by a few centimeters according to my experience results in deleting the original wall and drawing a new one.
Since also assigning colors and textures in a controlled way turned out to be a bit tricky I also went away from SketchUp.
But what´s next?
As I could not find a suitable alternative for my Mac, I decided reluctantly to move back to my company PC.
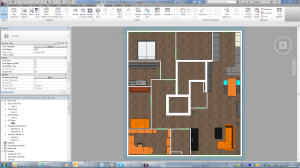
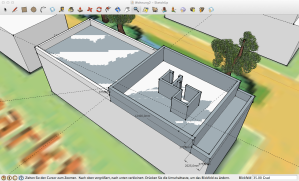
Top view of the Revit 2013 model of our new apartment
With my company being a development partner of Autodesk I enjoy the luxury of having access to all their products. So I decided to move on with Autodesk Revit 2013, a dedicated 3D CAD system for architectural and civil engineering applications. Even for people without a degree in architecture Revit is reasonably easy to learn. In fact, once you understood the concept you can work very fast with it. The software offers all necessary building elements. For furniture one can use various online libraries or design one´s own objects. In Revit they are called “families”. Family objects can be inserted into Revit projects, moved around and modified to the requirements.
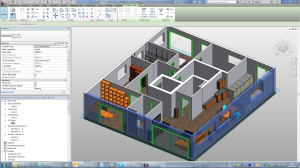
What I like in particular is that the furniture I designed automatically snaps to walls and to the floor when I place them in the project. This makes moving them around very ease and I do not have to check whether an object drops through the floor or is amalgamating with the walls.
I even managed to assign colors and textures to my drawing. This lets you really get a quite realistic impression of how the finished apartment will look like.
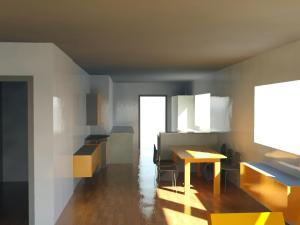
Rendering of a view from the drawing room area towards the open kitchen. Revit 2013.
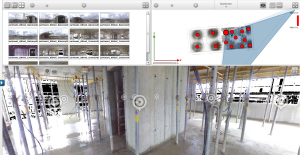
But one thing am I really missing in Revit 2013: I cannot freely walk around in the model to get a feeling how I would feel like in the real building. There are easy ways to set up a camera which then creates a still image shot with quite good rendering quality. But i cannot walk around like I am used to it from my (FARO´s) point cloud software SCENE.
Luckily, Autodesk offers another software which does exactly this. Navisworks allows to import various different CAD file formats and then freely navigate around like in a computer game. As far as I know, Navisworks ships with the Revit suite. So there is normally no additional cost involved.
One could think apart from the requirement to have a solution for my Mac all is fine now.
Yet, visiting my virtual apartment in Navisworks does somehow not look as good as it does in Revit itself. Navisworks seems to ignore the texture settings of the Revit model. Or maybe I am just not clever enough to find the right settings.

View in the opposite direction from the kitchen towards our future roof garden. Revit 2013.
I have not yet found the perfect tool for me.
The combination of Revit 2013 + Navisworks 2013 seems to form a usable tool. But somehow I am not fully satisfied. I would love to have the navigation capabilities of Navisworks directly built into Revit. Or, in case that would be too much of a demand, I would at least want to see my models in Navisworks at least as nicely rendered as in Revit.
Almost forgot one point: for private applications like mine, I would love to see this as a free of cost software (or at least low-cost) similar to the Homestyler idea of Autodesk which would be independent from my computer hardware.
Let´s see what the future of 3D design software will bring to us…